Monday, May 13, 2019

Third Grade Camera Day

I had the idea from the beginning to get the Leica into the hands of photographers much younger than myself. Having a camera day with my son's third-grade class was a perfect idea. Of course, I never think small, and I thought this would be a great time to clean up and get working a few of my other vintage cameras.
I began to disassemble and clean the cameras and research online on how to use 120mm film (the only easy to find large format film still being produced) in the old cameras. Installing film in the cameras required sanding, cutting the film rolls, and using adaptors to make the film fit.

Here I am sanding a roll of 120mm film to fit in the Kodak Duraflex II camera

Film for Duraflex II camera

Cleaning the Vintage Cameras

Completed Cameras


List of cameras loaded with some film:
1. 1920's Kodak No 2 Brownie Box Camera
2. 1920's Kodak Folding Pocket Autographic Camera
3. 1930's Kodak Six-16 Brownie Box Camera
4. 1937 Leica IIIA
5. 1950's Brownie Hawkeye
6. 1950's Kodak Duraflex II
7. 1980's Nikon FM2
8. 1990's Nikon N6006
List of cameras without film:
1. 1920's Autographic Kodak Junior Folding Camera
2. 1920's Vest Pocket Cameras (2)
3. 1940's Kodak Baby Brownie
4. 1970's Kodak 110 Instamatic
5. 1990's Polaroid Camera
List of Digital Cameras:
1. 2005 Nikon D50
2. 2010 Nikon D3100
3. 2013 Nikon D7100
4. 2019 Nikon D500
5. 2012 GoPro Hero 2
6. 2017 GoPro Hero 5
The big day came and was able to set up the cameras on two tables while the class was at recess.

We were also joined by James Patterson, a photographer with the Valley News. They will be doing a feature article on the Leica Project.

I put together a twenty-minute powerpoint presentation on a brief history of photography. The children seemed to enjoy it, but I am glad it was not longer.

After the presentation, the children were able to use the cameras taking pictures of some static objects. They all seemed to enjoy it and asked many questions.

The young photographers that were not taking pictures were being entertained by looking at Brent's online blog.

The day was a huge success!

Here is some of the film that they took drying at the Vermont Darkroom.

Thursday, March 28, 2019

First Photos Taken with the Leica IIIa

Great news, I just received the first roll of negatives back from The Vermont Darkroom. The Leica IIIa photos compiled over a week of shooting around town and at home. An Epson V600 scanner scanned the negatives with some minor post-processing in Lightroom.


Saturday, March 16, 2019

Leicameter 2 Repair with Silicon Photo Cell

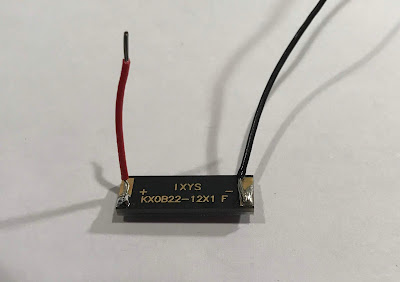
As I mentioned in an earlier post, the used 1960 Leicameter 2 light meter that I purchased on eBay required a new selenium cell. There were no selenium cells to be found online. The only source, located in the UK was out of business. I read online about an alternative to selenium by using silicon based cells. These are the same cells used in calculators.The existing selenium cell is 25mm by 10mm. I was able to find a silicon cell measuring 22mm by 7mm.
Old Selenium Cell from the Front

Leicameter 2 selenium cell

Rear of Selenium Cell (notice crack)
Leicameter 2 selenium cell

I was able to find a silicon cell measuring 22mm by 7mm.
New Silicon Solar Cell
leicameter 2 solar cell
The other item needed is a resistor. Not knowing what the output of the original selenium cell is, I purchased a 100K OHM adjustable resistor.
New 100K OHM Adjustable Resistor
Leicameter 2 adjustable resistor


I soldered wires onto the new silicon solar cell. Next, on the + side I soldered inline the resistor. To take full advantage of the adjustability of the resistor, you must connect between terminal 1 and 2 (middle).
leicameter new solar cell

leicameter new solar cell and resistor

Now it is time to run some tests. I touched the terminals connected to the electromagnet with the wires from the new solar cell and voila the needle moved. I adjusted the resistor until the needle matched the reading of another lightmeter that I own. I proceeded to remove the old cell and resistor and replaced with the new solar cell. To take up some extra space I used a small piece of painted balsa wood. After reassembling I checked against my other meter and adjusted the ASA/ISO gauge to match.
Completed Leicameter 2

How it Looks on the Camera
Leica IIIa with Leicameter 2

Leica IIIa with Leicameter2


For more information on the Leicameter click here.

Tuesday, March 12, 2019

Looking For a New Camera Case

The original leather camera case had seen better times. Being in storage for over 50 years has caused the leather to dry out. The biggest problem is the broken strap. To keep the camera in pristine condition a proper case and strap are needed. I took the case to my local leather repair shop, The Country Cobbler. They were great to work with and even took pictures before and after. When I went o pick it up, there was some bad news. The case is too delicate for daily use.
Before the Repair


I went online when I got home to search for a replacement case. In a half-hour, I found Luigi of Luigi Cases located in Rome, Italy. He is a former Leica dealer who now creates custom leather cases for Leica and other brands. I sent the money through PayPal and within minutes it was on its way to me. In three working days, the case arrived and it is a beauty.
Camera With the New Case

Leica Lesson Number One: Make Sure the Film is Loaded Properly!

Leica Rewind Knob Leica Winding KnobWell, I was taking pictures all last week with the Leica. I am shooting with Kodak 400TX Black and White film. As I was getting close to 36 exposures, I was thinking to myself, "Finally I can send a roll of film out to make sure the camera functions properly." When I got to forty exposures, I had to check the camera. First, I went to the manual (that I redid) and it says, "While the winding knob rotates clockwise, the rewind knob should turn in the opposite direction to the arrow. This will indicate that the film is traveling properly." Oops, this was not the case. All week I have been taking pictures of nothingness, black matter, the third dimension or the twilight zone. It took me two times to get it loaded correctly - not as easy as I thought.

Tuesday, March 5, 2019

Leica IIIa Test Portrait Samples

Last night the kids and I performed a test using the Leica IIIa with Summar 50mm lens and my Nikon D7100 with a Nikon 50mm prime lens. Using similar settings, distances, lighting, etc I wanted to be able to compare some shots between the two cameras after I get the Leica’s film developed. Will post the Leika shots in a few weeks. Here are a few shots that were taken with the Nikon:
The Leica Project - Test Shot one The Leica Project - Test Shot two
The Leica Test - Test Shot Three

Updated Leica III Manual Completed

After looking at the original manual, I knew I had to update it. It was not specific to my camera model and some things have changed since the manual was written 70 years ago like the introduction of much faster film, ISO became the new standard for film speed, and the f-number scale was standardized in 1961. Click the image below to have a look.

Leica III Instruction Manual Updated

Monday, March 4, 2019

The Leica Meter 2

A light meter is really useful with an old camera like the Leica IIIa. Leika made what they called the LEICAMETER. They had two universal meters that fit on the older Leicas and then they came out with the LEICAMETERS for the LEICA M Series cameras that actually coupled to the shutter-speed dials.
I ordered one on eBay knowing that it might not work but was hoping that it could be repaired. Unfortunately, it could not be repaired. I opened it up and it was very clean with no corrosion on the terminals. I even took the Selenium cell out. I wrote to the only person that I could find online that repairs old light meters. It is a place called
Quality Light Metric. He wrote back saying the cells are no longer available. There was a place in the UK that was cutting them, but they went out of business.
Here is what it looks like on the camera

The Leica Project - With Leicameter 2
Here is what it looks like apart.
Leicameter 2 - The Leica Project
I have read that a calculator solar cell might work in the place of the selenium cell. A project for another day.

Tuesday, February 26, 2019

The Camera is on its Way Home

Last week I sent the Leica camera to Youxin Ye of YYE Camera. He works out of his home repairing Leica cameras. I mailed the camera to YYE Camera on a Wednesday, and on Monday it is completed - very fast turnaround!
This is what he wrote to me: "Leica IIIa - CLA'd, cleaned, and lubricated mechanical parts, adjusted shutter speeds. Shutter works well at all speeds now.  Cleaned both finders and adjusted focus. Both finders are clean and clear now. Summar 50/2.0 lens - CLA'd, cleaned and lubricated both focus and aperture rings, cleaned optics.The lens is clean and clear now considering its age.Tested the lens with a digital M body, the lens is in focus and produce good images".

Here is a picture that he took when the camera was all apart:

The Leica Project - At the Shop
This all sounds great. I will receive the camera tomorrow. I now have to order some film (which a whole other topic).

Welcome to the Leica Project

The Leica Project - Headed to the Repair ShopAs I get older, I am finding that I like older things. It might be because of the workmanship, the simplicity, or complexity of the objects. I am drawn to old records, stereo equipment, tools, and being a photographer - old cameras.

A few years ago my father gave me an old Leica IIIa. This style camera which is also nicknamed "screw mount", "LTM" (Leica Thread Mount), "Barnack Camera" (named after the inventor), and "bottom loading camera" was manufactured between 1937 and 1938.

The goal of this project is to:
1) Get the camera back in working order (at the time of this writing, the camera is coming back fully operational and in like new condition).
2) Learn how to use the camera (I have been watching many YouTube Videos).
3) Get four or five local photographers to take the camera for a week to take a roll or two of pictures.
4) Bring the camera to local schools, assisted living facilities, etc and have them try out the camera.
5) Document all the goals above, print out the best photos and possibly put the photos into print.
Please follow us on our journey!